What is Viscosity?
Viscosity is a measure of a liquid’s resistance to flow. And you don’t need to work in a laboratory to observe this. Anyone who’s spent any time in the kitchen has observed a variety of liquids with a wide variety of viscosities.
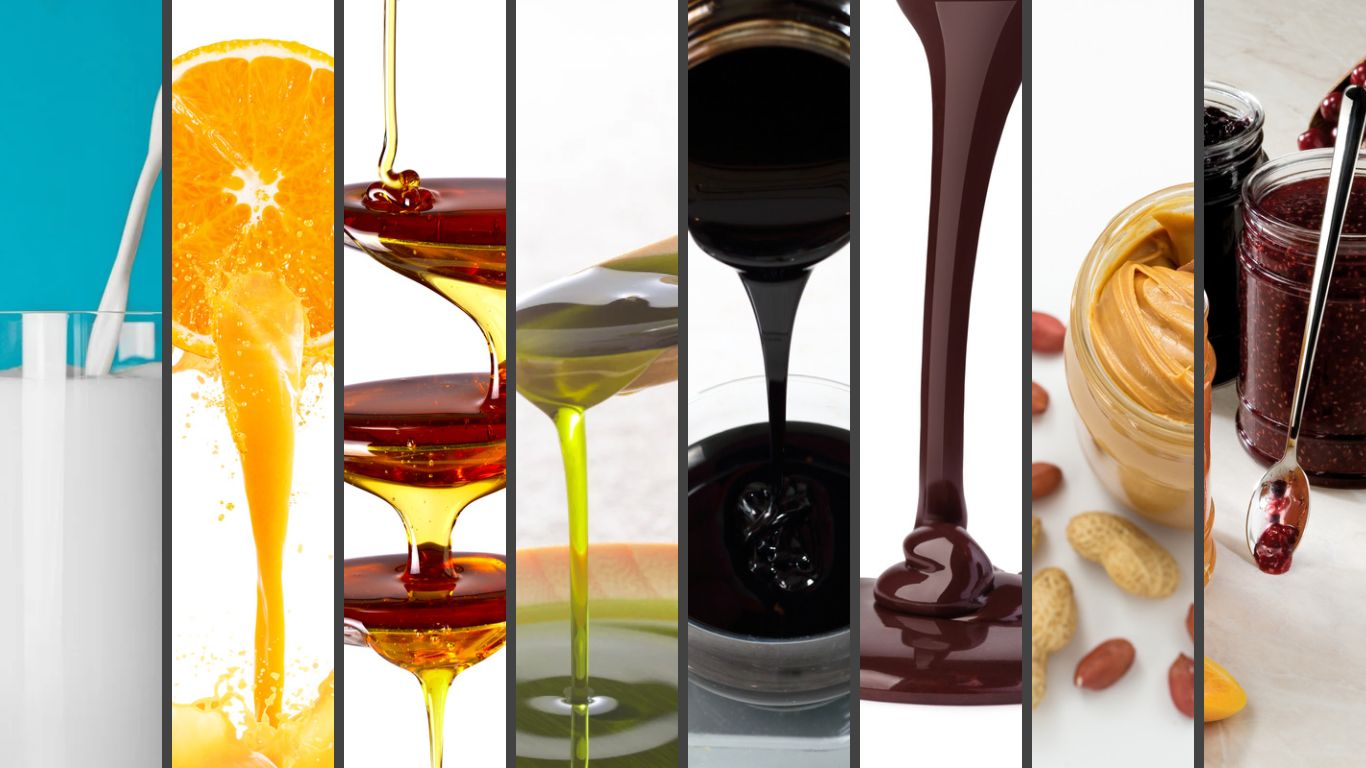
- Water, milk, and fruit juice all flow very easily; this can be observed when you pour each into a glass. These are all examples of low viscosity or thin liquids.
- Other examples such as vegetable oil, maple syrup, and dish soap are considerably more viscous, resisting flow and pouring out more slowly. These are all examples of medium viscosity liquids.
- Honey, molasses, and melted chocolate are very difficult to pour and often we reach for a spoon or other utensil to speed the process. These are all examples of high viscosity liquids.
- Peanut butter, jam, and caramel often don’t pour at all and require utensils to get them out of the container. These are all examples of very high viscosity liquids. These liquids are so thick that they begin to blur the line between liquid and solid. But unlike solids the viscosities of these liquids can be measured and quantified.
Perhaps the most important distinction between solids and liquids (at least from our pump manufacturer point of view) is “can it be moved with a pump?”. The answer is yes to the full list above, but the key is knowing, beyond a general description of “viscous”, what the liquid’s viscosity actually is.
Units of Viscosity and Measurement
The terms I used above are very subjective. As an example, if you were to ask me if I’m tall, I’d say yes. But if I were to step onto the court at a professional basketball game, you’d be more accurate to describe me as short. The same is true of viscosity. For customers handling mostly thin liquids like water, vegetable oil would be considered a viscous liquid. At a chocolate manufacturer, they consider vegetable oil to be a thin liquid. Without measurement and quantification, viscosity is relative.
One of the easiest tests was already described above…the pour test. In its simplest form this can be pouring out two identical volumes of liquid, one of known viscosity, and one to be measured. If their viscosities are similar, then the pour times will be similar. A similar method would be to drop a marble or metal ball into the fluid and time how long it takes to flow through the liquid. In this case it’s important that the ball be of the same size/weight and the containers be of the same size, giving the liquid the same area to flow around the ball as it descends.
- Dynamic Viscometers
- FALLING BALL or FALLING PISTON – These viscometers work on the descending marble or ball test described above. Again, time is the measurement, timing how long it takes for the weighted ball or piston to drip through the liquid as it flows around it. One minor drawback is that these viscometers cannot be used on opaque liquids.
- ROTATIONAL VISCOMETERS – These viscometers use a rotating spindle (cup, rod, cone, plate, etc.) to “stir” the liquid sample and measure the resulting shear stress. These are typically the most expensive viscometer on this list but have the big advantage of being able to observe and quantify the effect shear has on the liquid’s viscosity (more on this later). For very high viscosity fluids (like the peanut butter example above) this is the best option.
But what if you don’t have access to a viscometer? There are a couple of methods to estimate a liquid’s viscosity.
- How to Estimate the Viscosity of a Liquid
- COMPARISON METHOD – By pouring or “sloshing” a liquid in a jar and comparing its flow to another liquid of a known viscosity, you can estimate whether the sample liquid is more viscous, less viscous, or roughly the same viscosity as your known comparison liquid. Common examples used for comparisons include:
Water 1 cSt
Diesel Fuel 4 cSt
Olive Oil 70 cSt
Hand Soap 3300 cSt
Corn Syrup 3600 cSt
Honey 7000 cSt
Toothpaste 70000 cSt
This is a fairly subjective method and just a very rough estimate of a liquid’s viscosity, but descriptions like this can help to better define the viscosity of a liquid rather than using vague terms like “thick” or “heavy”
For a more accurate measurement a viscometer will be needed. A viscometer is any device that is designed to measure viscosity. There are a lot of types of viscometers available ranging in price and with varying ranges of viscosity measurement. First, there are two different types of viscosity measurement.
- Kinematic Viscosity is dependent on the density of the liquid. There are a variety of units of measure, but the most common is centistokes, abbreviated cSt.
- Dynamic Viscosity is dependent only on shear stress or forces involved in the deformation of the liquid. There are a variety of units of measure, but the most common is centipoise, abbreviated cP.
Conversion between the two is very easy using the following equation:
cSt x specific gravity = cP AND cP ÷ specific gravity = cSt
Let’s look at a few of the most common examples of each type of viscometer.
- Kinematic Viscometers
- VISCOSITY CUPS – A specific measured volume cup with a small orifice at the bottom. Viscosity cups work on the same pour test described above but are calibrated to ensure that an accurate measurement can be taken. The time required to completely drain the cup through the orifice is measured. The longer the time, the higher the viscosity. In some cases, the time itself is the unit of viscosity measurement. Examples include Saybolt Seconds Universal (abb. SSU or SUS) or Saybolt Seconds Furol (abb. SSF or SFS). Others feature an easy conversion for the time in seconds directly into centistokes. There are a wide variety of cups available including Ford, Zahn, Shell, and Craftsman and even different numbers based on orifice size and the range of viscosities they’re calibrated to measure. These are low cost and can be dipped into the liquid to allow measurement at the point of use.
- CAPILLARY TUBES – A specific volume of fluid is placed in a U-shaped glass tube with two bulbs. Time is measured for how long it takes the fluid sample to pass from one bulb to the other. Like cup viscometers these come in a variety of sizes depending on the range of viscosities they’re designed to measure. These are popular in lab environments where smaller samples are to be measured.
- CONSISTOMETERS – A sloped tray with markings along its length to measure the distance a product will flow over a specified time. A spring-loaded gate near the top of the tray is opened to allow the liquid to flow down across the markings. These are popular in the paint, ink, and food industries as they are easy to clean and can measure the consistency of shear sensitive liquids. One drawback is that they are not a true viscometer and won’t return a specific kinematic unit of viscosity…quantifiable, yes, but not directly convertible into traditional units of viscosity. For this reason, they’re often paired with dynamic viscometers.
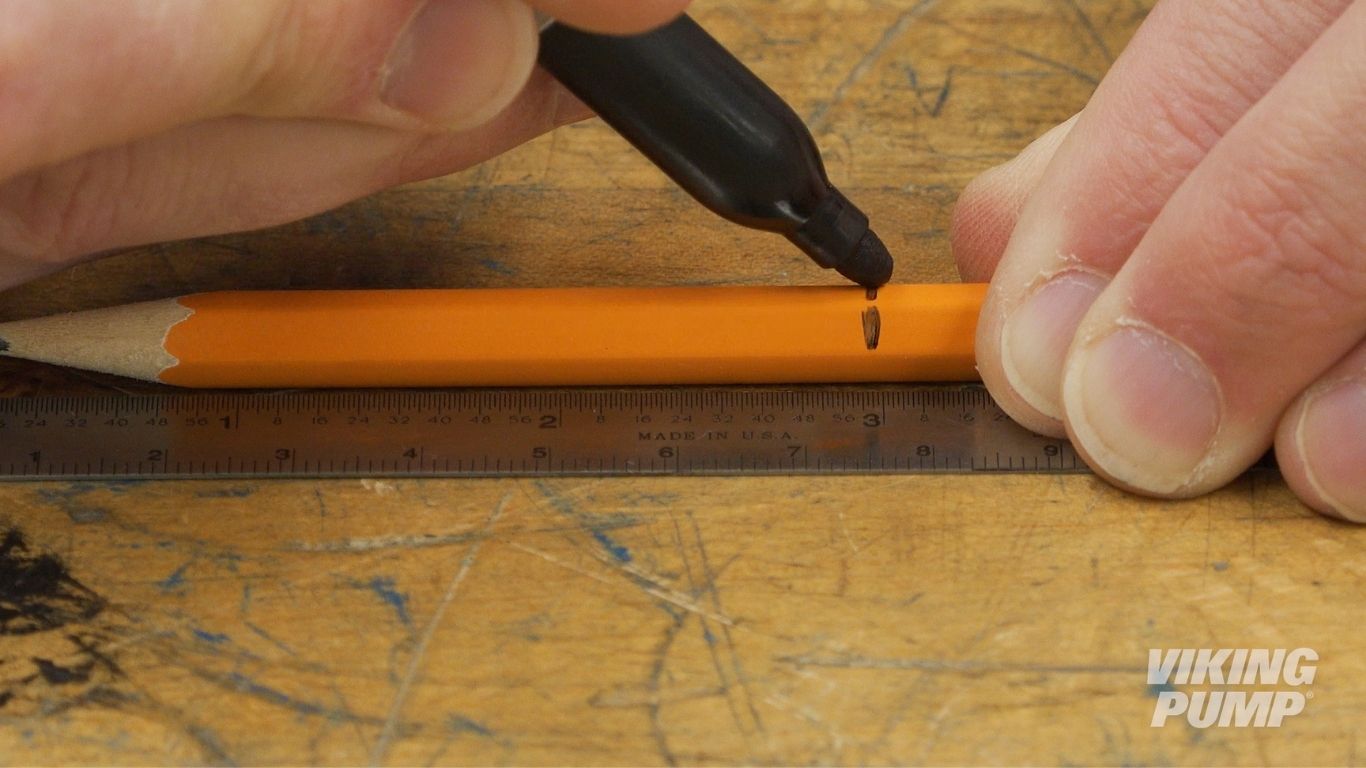
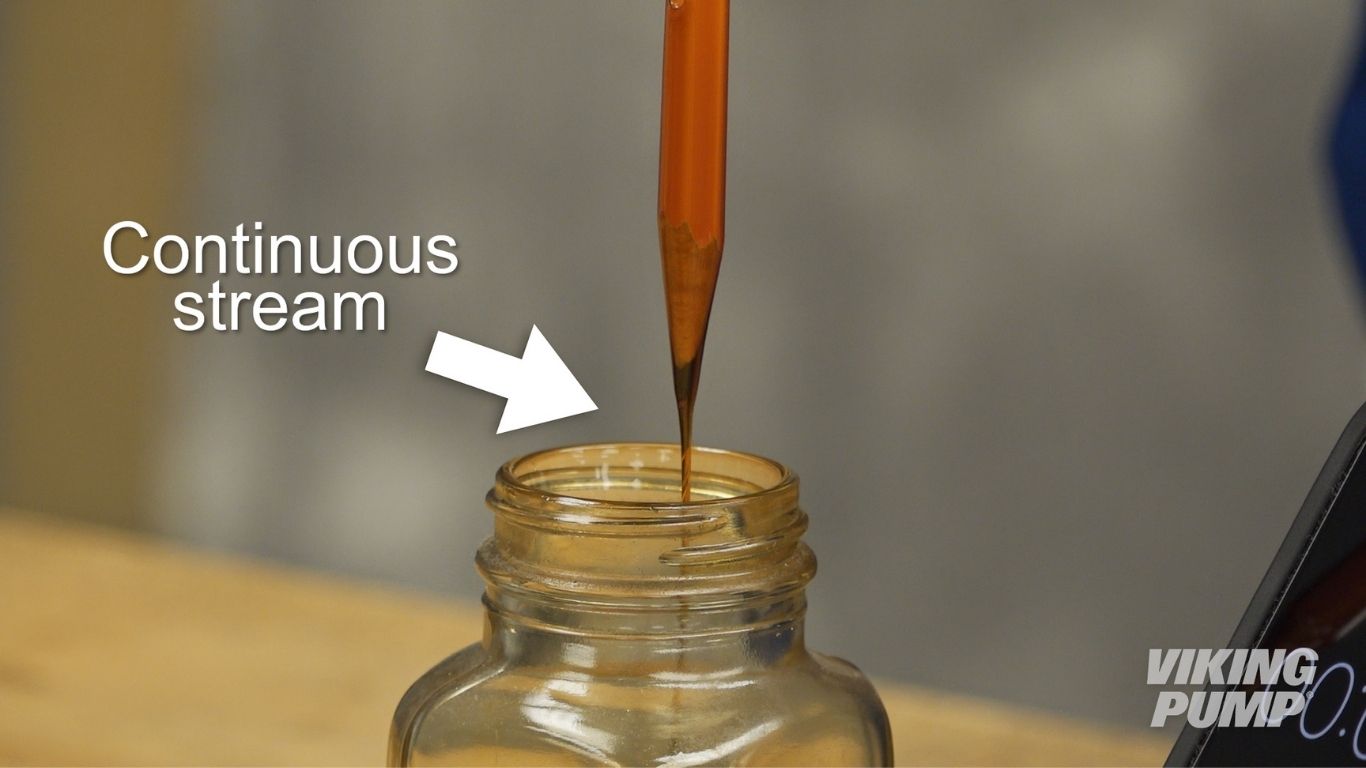
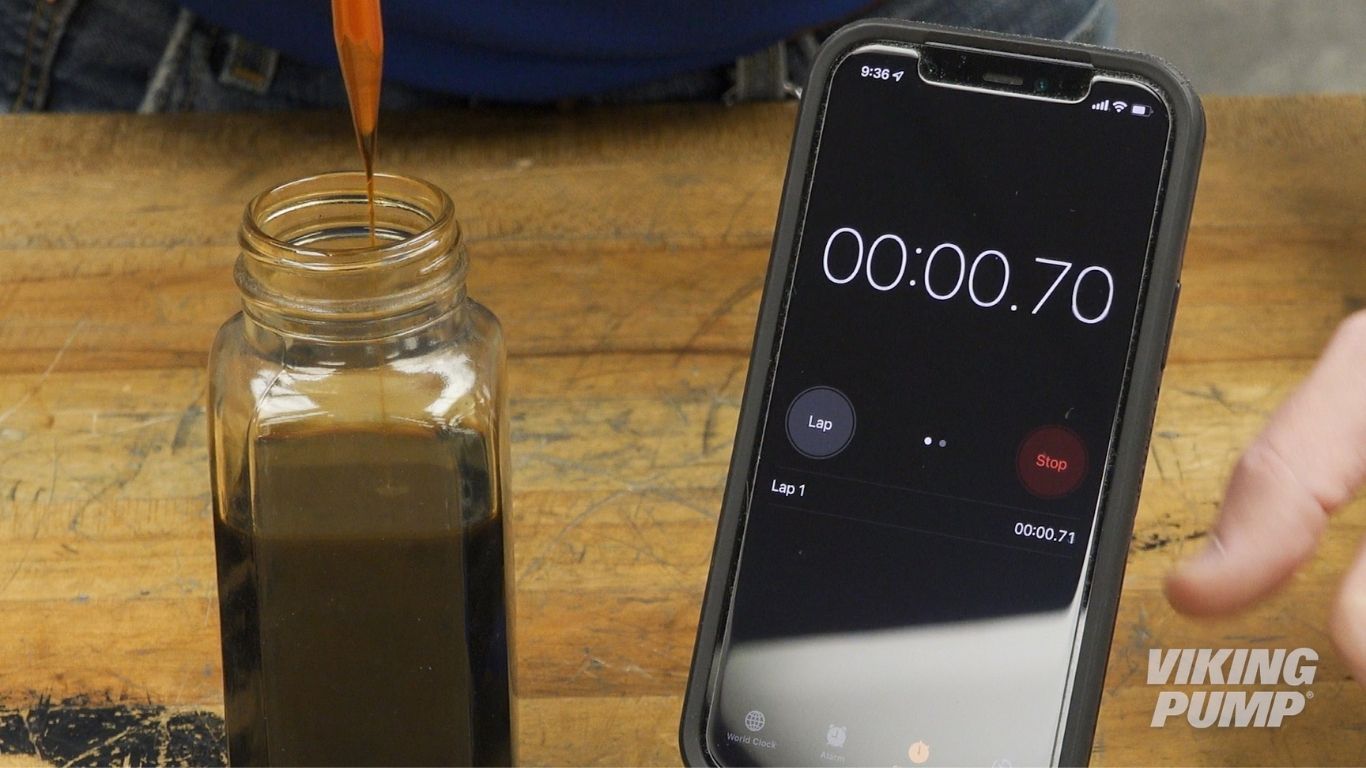
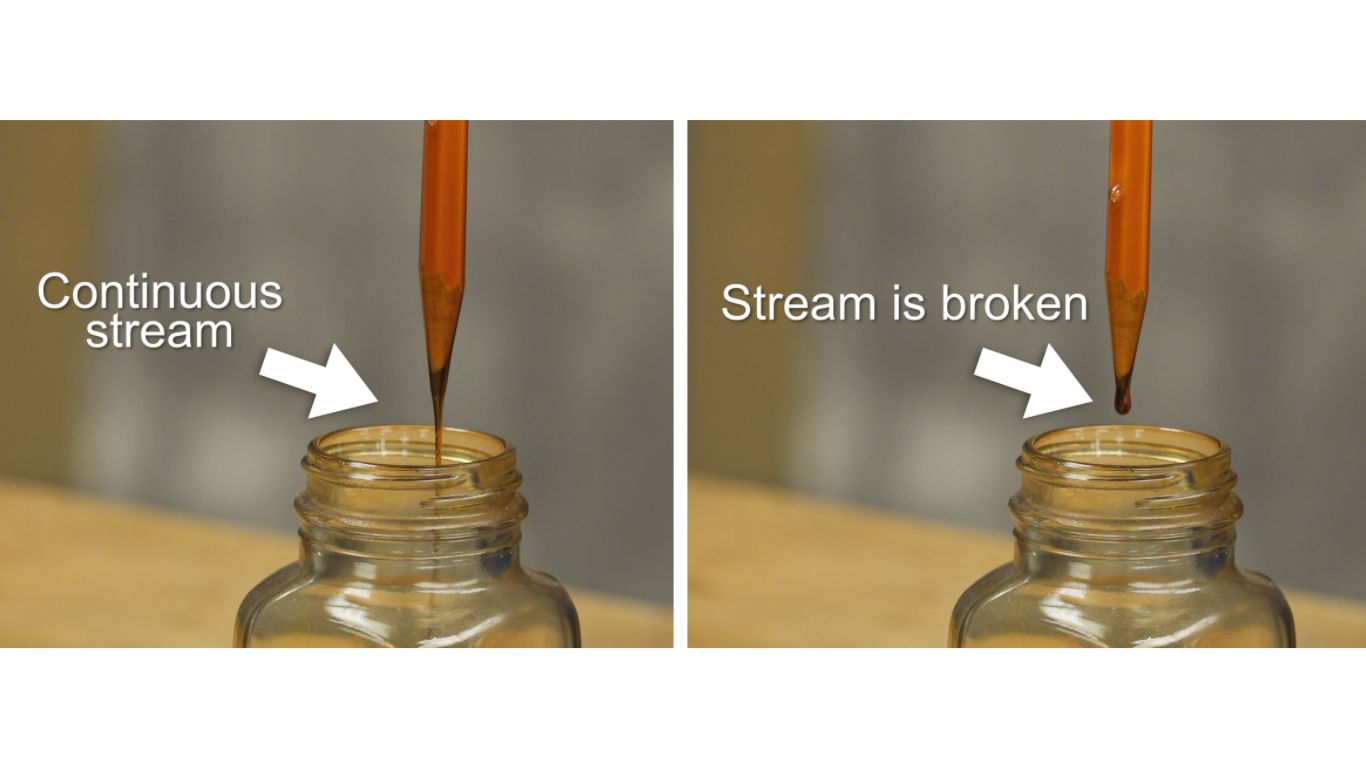
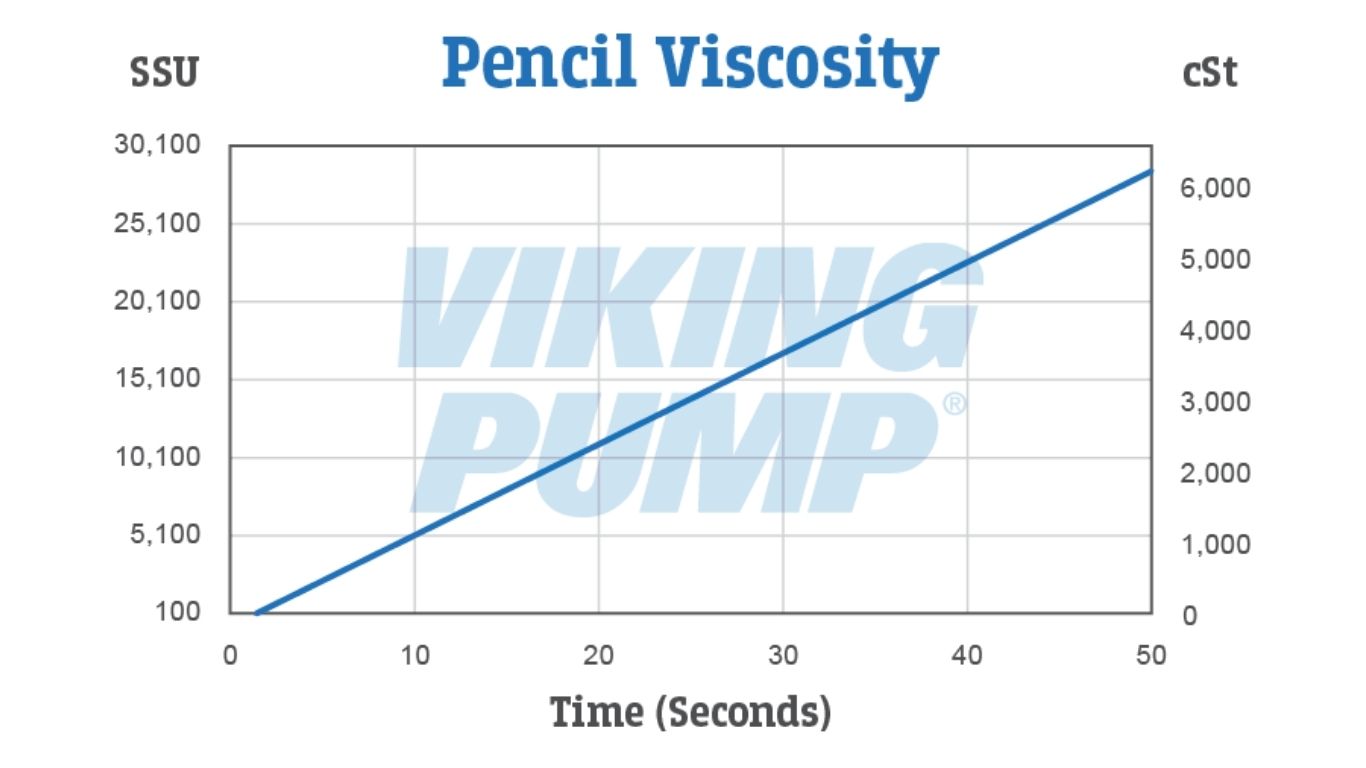
THE PENCIL TEST – Developed by Viking Pump, the pencil test is a crude form of a kinematic viscometer. It uses a sharpened wooden pencil, a container of liquid deep enough to submerge the pencil to a depth of 3”, and a watch or timer.
DISCLAIMER: This method works best for viscosities between 100 and 7500 cSt. Your best and most accurate measurements will be made with a viscometer, but in lieu of that these methods allow for an estimate to be established.
No matter which method of measurement is used it’s important to take system variables and their effects into consideration before selecting and sizing a pump.
System Variables and Their Effect on Viscosity
Let’s go back to our kitchen example from before. Anyone who’s ever applied heat to oil, syrup, or sauce knows the effect this has on viscosity. With very rare exceptions, a liquid’s viscosity varies inversely with temperature. The lower the temperature, the higher the viscosity. This means that usually a liquid’s viscosity isn’t a set value, but rather a range. Keeping liquid’s indoors and in temperature-controlled environments will narrow that range, but it’s still important to consider what the maximum and minimum viscosity will be for a pumping application.
Adding temperature through heating can also be used to reduce the viscosity of the liquid, allowing reduction in the size of the pump, reduction in frictional line losses, and reduction in the size and power consumption of drive equipment. It also can make possible the pumping of room-temperature solids such as chocolate, wax, and even asphalt.
Another variable to consider is shear. For some liquids shear has no effect. These liquids are classified as Newtonian liquids. A common example is water. If you measure the viscosity of water before and after vigorous stirring, you’ll find that the viscosity is the same, independent of shear.
For other liquids shear can alter the viscosity. These liquids are classified as non-Newtonian liquids. A common example is ketchup, which is a non-Newtonian, shear-thinning liquid. Stationary in the bottle, ketchup behaves like a viscous liquid and doesn’t easily pour. But impart shear by shaking or hitting the bottle and it thins, easily pouring out.
In a pumping systems shear occurs as the liquid moves through pipes, fittings, and the pump itself. Understanding shear and its effects can help in pump selection, sizing, and power consumption calculations.
Viscosity and Pump Selection
It’s important to remember that pumps designed for handling water and other thin liquids are not intended for handling viscous liquids. At best, they’re inefficient when handling viscous liquids. At worst, they catastrophically fail, resulting in seal leakage and mechanical failure.
As a rule of thumb here are the various classes of pumps and where they are applied across a range of viscosities:
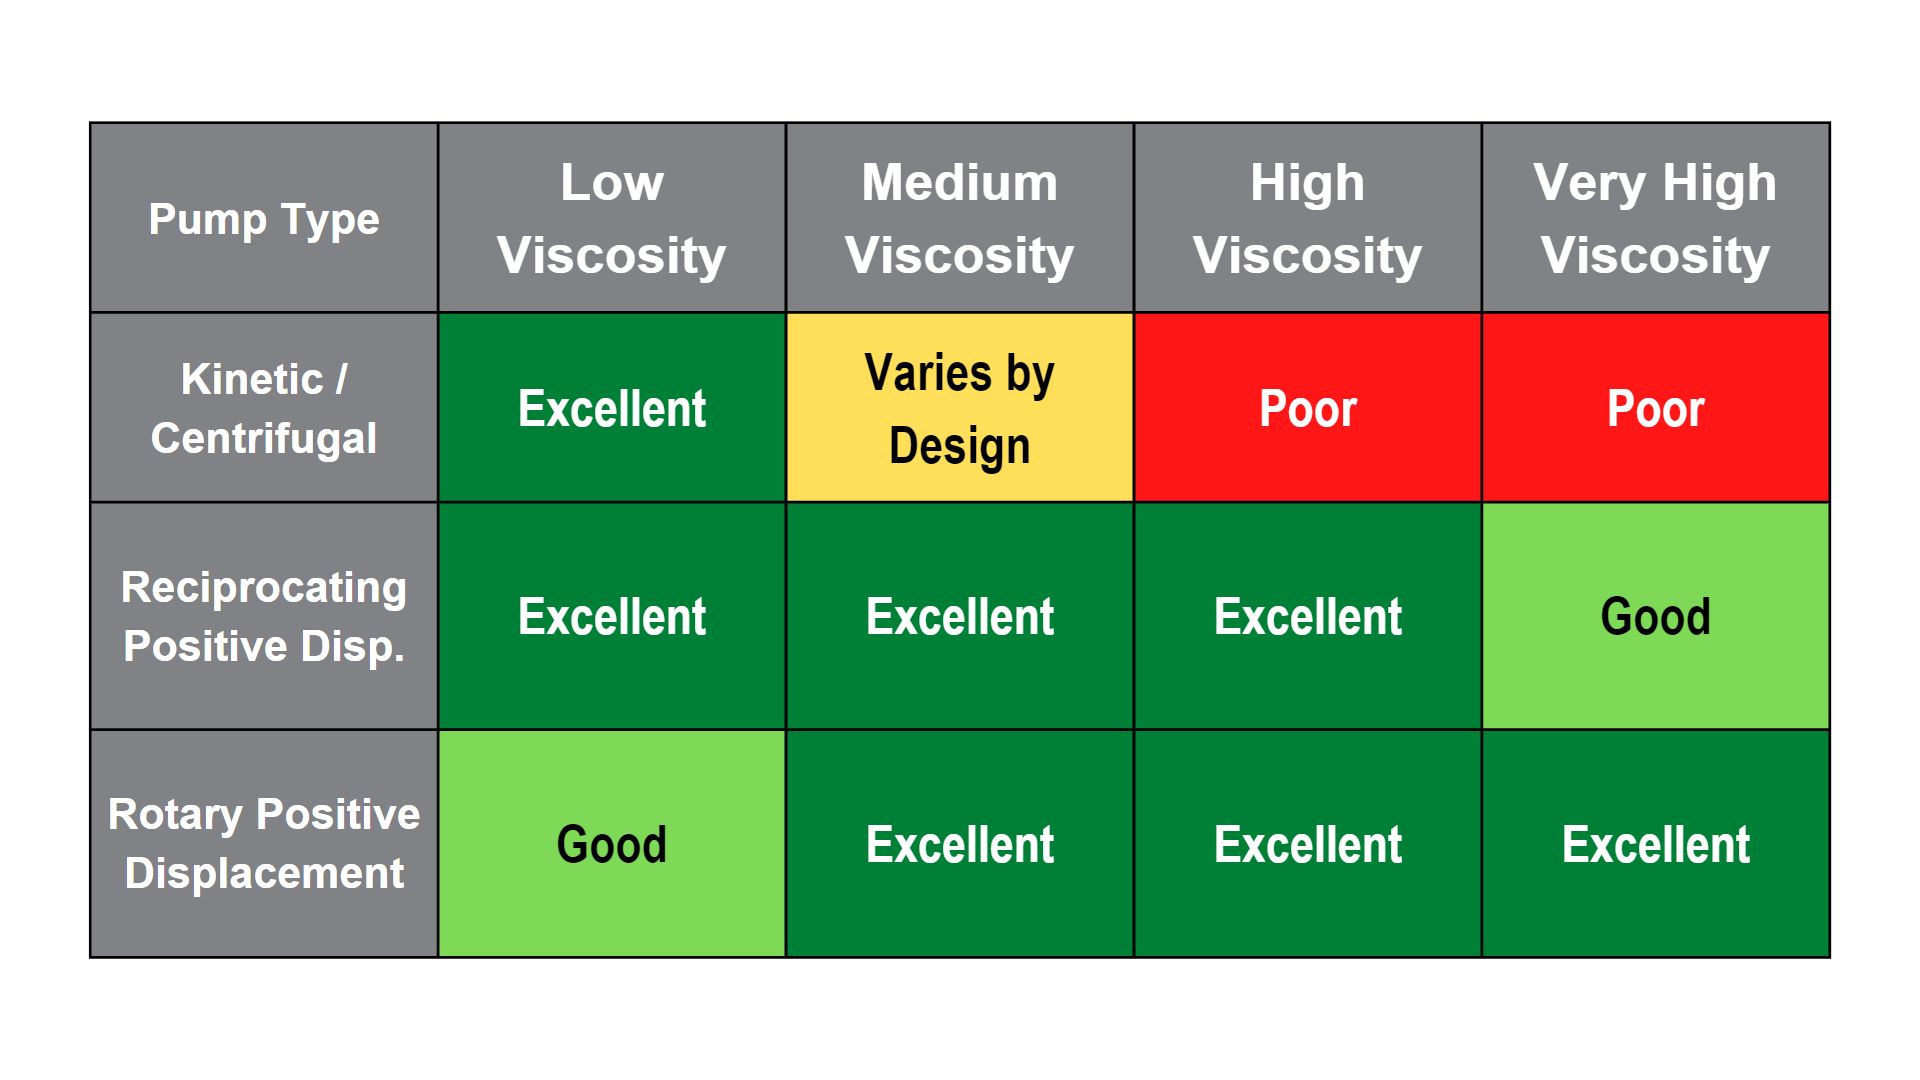
Even with this guide it’s important to ensure that the pump’s construction, seal, and associated drive equipment are appropriate for the range of viscosities to be handled.